What You'll Learn
- Understand the difference between supervised and unsupervised classification
- Generate training data using random sampling
- Apply the k-means clustering algorithm
- Interpret and label unsupervised classification clusters
- Compare supervised and unsupervised results for the same image
Building On Previous Learning
This lab directly extends Lab 11 where you created a supervised classification. Now you'll classify the same image without training data and learn when each approach is most appropriate.
Why This Matters
Unsupervised classification is essential when:
- No training data exists: You don't have labeled samples for your study area
- Exploring data: You want to discover natural groupings in the spectral data
- Large areas: Manual interpretation of training data is impractical
- Baseline mapping: Quick first-look analysis before detailed studies
Before You Start
- Prerequisites: Finish Lab 11 and review the clustering techniques overview from the readings.
- Estimated time: 75 minutes
- Materials: Earth Engine account, Lab 11 code, and a notebook for labeling clusters after inspection.
Key Terms
- Unsupervised Classification
- Classification where the algorithm discovers patterns in data without pre-labeled training samples.
- K-Means Clustering
- An algorithm that groups pixels into k clusters based on spectral similarity by iteratively updating cluster centers.
- Centroid
- The center point of a cluster, calculated as the mean of all pixel values in that cluster.
- Cluster
- A group of spectrally similar pixels identified by the algorithm, which must then be labeled by the analyst.
Introduction
In this lab, we will build off work from Lab 11 - Supervised classification. You can use your Lab 11, or you are welcome to use this Code to start off with: https://code.earthengine.google.com/e5b89ac826e8e2ef8c08111e929b07e1
In Lab 11, we trained a supervised classification with a training sample and used it to create a landuse/landcover map in Northern Italy. We will build off that lab to classify the same image with an unsupervised classification. At the end of this assignment, we can compare supervised versus unsupervised classification results.
Supervised vs. Unsupervised: A Comparison
| Aspect | Supervised | Unsupervised |
|---|---|---|
| Training Data | Requires labeled samples | No labels needed |
| Analyst Input | Before classification | After classification (labeling clusters) |
| Classes | Predefined by analyst | Discovered by algorithm |
| Speed | Slower (training data collection) | Faster initial run |
| Best For | Known land cover types | Exploratory analysis |
The Unsupervised Classification Workflow
The unsupervised classification in Earth Engine has this workflow:
- Sample the image - Get random pixel values (training data)
- Instantiate a clusterer - Choose an algorithm (k-means)
- Train the clusterer - Let it find spectral clusters
- Apply to scene - Classify all pixels
- Label clusters - Interpret what each cluster represents
Step 1: Add a Comment Separator
Before we start, add a comment in the code to mark where unsupervised classification begins:
//////////////// Unsupervised classification ////////////////Then, save the code in a new file using the Save As menu.
Step 2: Generate Training Data
Unlike supervised classification where we collected specific training points, we'll randomly sample pixels from the image:
// Make the training dataset.
var training = Landsat.sample({
    region: Landsat.geometry(),
    scale: 30,
    numPixels: 1000,
    tileScale: 8
});
Key Parameters:
numPixels: 1000- We sample 1000 random pixelstileScale: 8- Helps avoid memory errors for large regions
Step 3: Instantiate and Train the Clusterer
We'll use k-means clustering with 4 clusters (matching our supervised classification):
// Instantiate the clusterer and train it.
var clusterer = ee.Clusterer.wekaKMeans(4).train(training);
How K-Means Works
- Randomly place k seed points in spectral space
- Assign each pixel to its closest seed (cluster)
- Calculate the mean (centroid) of each cluster
- Reassign pixels to the new closest centroid
- Repeat until centroids stabilize
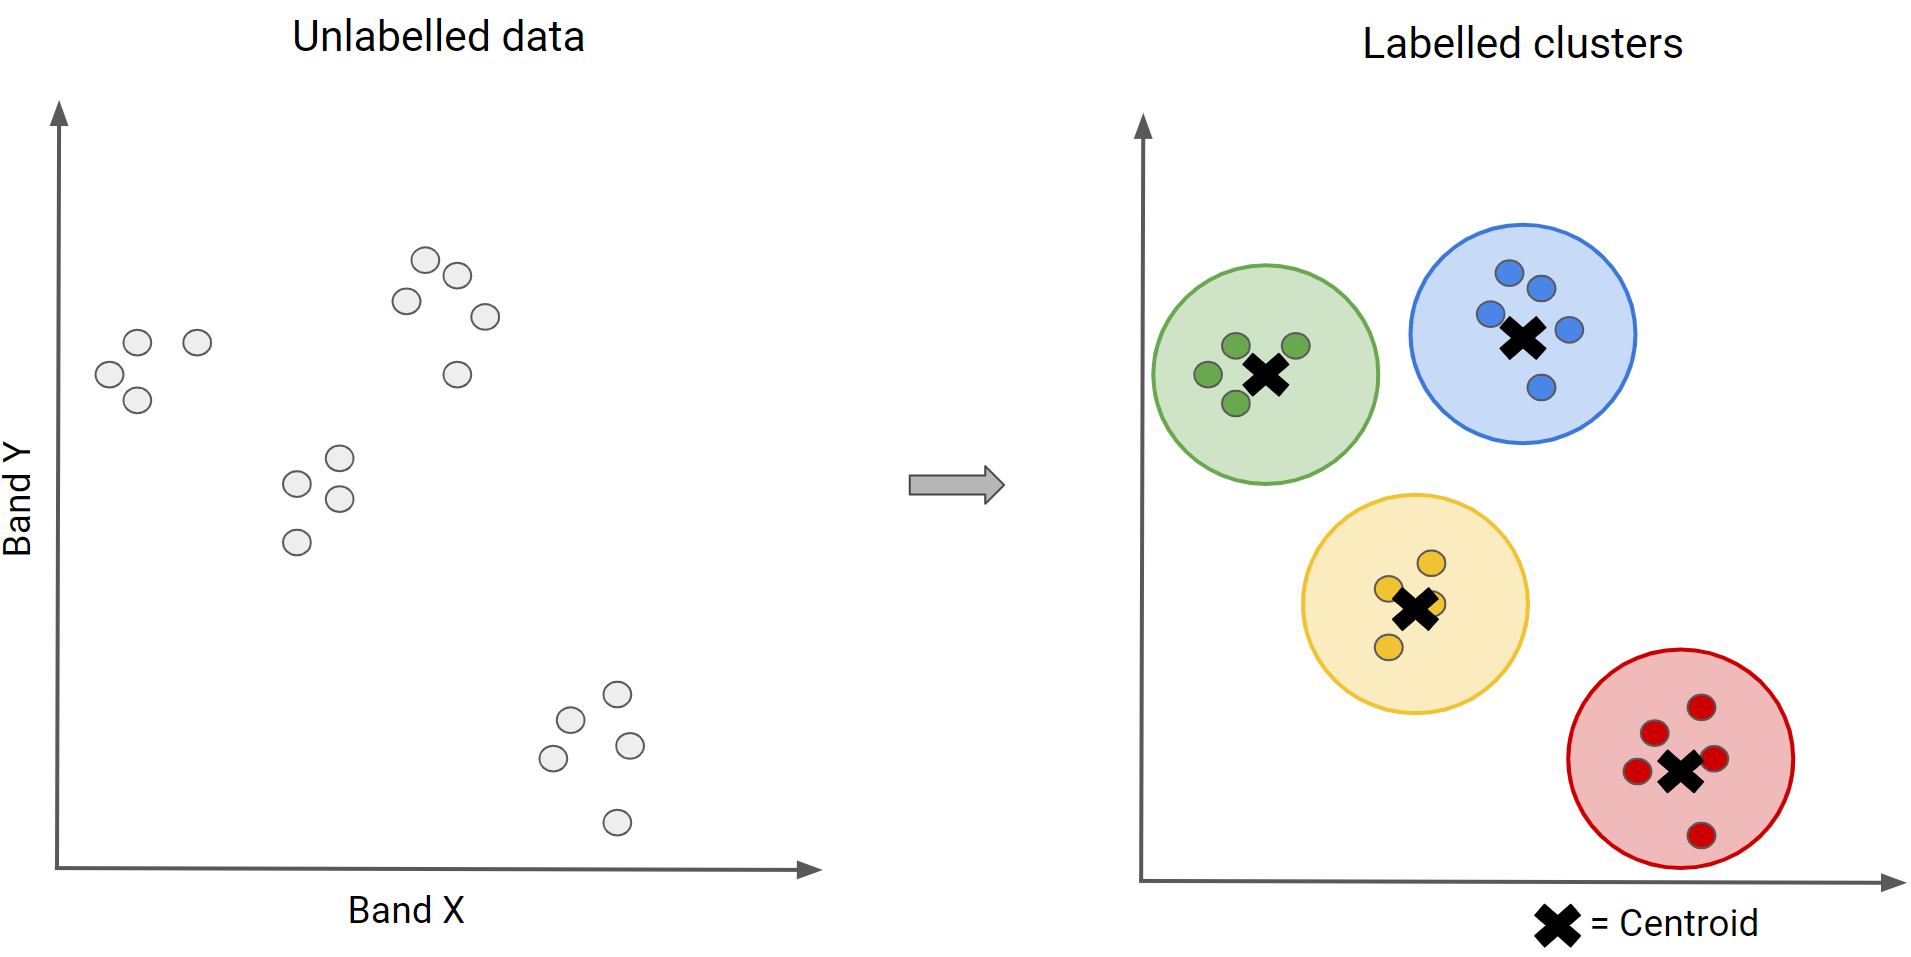
Figure - K-means visual concept showing iterative clustering
Step 4: Apply the Clusterer
Apply the trained clusterer to classify the entire image:
// Cluster the input using the trained clusterer.
var Kclassified = Landsat.cluster(clusterer);

// Display the clusters with random colors.
Map.addLayer(Kclassified.randomVisualizer(), {},
    'K-means classified - random colors');
Important: The colors are assigned randomly, so they won't match your supervised classification colors yet!
Challenge Tasks
Challenge 1: Identify Cluster Land Covers (20 points)
Your image has four clusters (values 0-3). Using the Inspector tool:
- Click on different land cover types in your map
- Look at the "cluster" band value
- Document which cluster number corresponds to each land cover:
- Herbaceous: Cluster ___
- Water: Cluster ___
- Forest: Cluster ___
- Developed: Cluster ___
Add a comment in your code documenting your findings.
Challenge 2: Apply Custom Color Palette (15 points)
Display the clusters with the same palette as supervised classification:
// Based on your Challenge 1 findings, reorder the palette
// Original palette: ['d0741e','1a11ff','589400', 'ff0000']
// (herbaceous, water, forest, developed)

Map.addLayer(Kclassified, {
    min: 0,
    max: 3,
    palette: [/* YOUR REORDERED PALETTE */]
}, 'K-means classified');
Challenge 3: Compare Results (15 points)
Inspect the results and add a paragraph comment explaining:
- How does the unsupervised classification compare to the supervised one?
- Which land covers were classified similarly? Which were different?
- What advantages and disadvantages do you see for each approach?
Check Your Understanding
- Why do we need to label clusters after unsupervised classification?
- What would happen if you set k=10 instead of k=4? Would it be better or worse?
- Why might two different land cover types end up in the same cluster?
- In what situations would unsupervised classification be preferable to supervised?
Troubleshooting
Solution: Increase the tileScale parameter (try 16 instead of 8)
or reduce numPixels.
Solution: This is normal! K-means groups pixels by spectral similarity, not by what they actually are. Some land covers may share spectral characteristics.
Solution: K-means has random initialization, so results can vary slightly.
Set a seed for reproducibility: ee.Clusterer.wekaKMeans(4).train(training)
Pro Tips
- Choose k wisely: Too few clusters merge distinct classes; too many split them unnecessarily
- Sample enough pixels: 1000 is a minimum; for complex scenes, try 5000-10000
- Use multiple runs: Run clustering several times to see if results are stable
- Combine approaches: Use unsupervised to explore, then supervised for final map
Key Takeaways
- Unsupervised classification finds natural spectral groupings without training data
- K-means iteratively assigns pixels to the nearest cluster centroid
- Analyst interpretation is needed AFTER clustering to label what each cluster represents
- Both supervised and unsupervised have strengths - they're complementary approaches
📋 Lab Submission
Subject: Lab 12 - Unsupervised Classification - [Your Name]
Submit:
A shareable URL to your code that includes:
- Working k-means classification code
- Challenge 1: Comment documenting cluster-to-land-cover mapping
- Challenge 2: Map layer with correctly ordered color palette
- Challenge 3: Paragraph comparing supervised vs unsupervised results
Total: 50 Points