Part 4: Multitemporal River Width
Up to this point, we walked through extracting the river centerline and width from a given water mask. In that section, we intentionally unpacked the different steps used to extract river centerline and width so that readers can: (1) get an intuitive idea of how the image processes work step by step and see the resulting images at each stage; (2) combine these functions to answer different questions (e.g., readers might only be interested in river centerlines instead of getting to widths).
In this section, we will walk you through how to use some high-level functions in RivWidthCloud to more efficiently implement these steps across multiple water mask images to extract a time series of widths at a given location. To do this, we must provide two inputs: a point of interest (longitude, latitude) and a collection of binary water masks. The code below re-introduces a helper function to convert between projections and then access other data and functionality.
var getUTMProj = function(lon, lat) {
    // Given longitude and latitude in decimal degrees,
    // return EPSG string for the corresponding UTM projection.
    var utmCode = ee.Number(lon).add(180).divide(6).ceil().int();
    var output = ee.Algorithms.If({
        condition: ee.Number(lat).gte(0),
        trueCase: ee.String('EPSG:326').cat(utmCode.format('%02d')),
        falseCase: ee.String('EPSG:327').cat(utmCode.format('%02d'))
    });
    return (output);
};

// IMPORT AND VISUALIZE SURFACE WATER MASK
var jrcYearly = ee.ImageCollection('JRC/GSW1_3/YearlyHistory');
var poi = ee.Geometry.LineString([
    [110.77450764660864, 30.954167027937988],
    [110.77158940320044, 30.950633845897112]
]);

var rwcFunction = require(
    'users/eeProject/RivWidthCloudPaper:rwc_watermask.js');
Remember that the widths from Sect. 1.2 are stored in a FeatureCollection with multiple width values from different locations along a centerline. To extract the multitemporal river width for a particular location along a river, we only need one width measurement from each water mask. Here, we choose the width for the centerline pixel that is nearest to the given point of interest using the function getNearestCl. This function takes the width FeatureCollection from Sect. 1.2 as input and returns a feature corresponding to the width closest to the point of interest.
// Function to identify the nearest river width to a given location.
var GetNearestClGen = function(poi) {
    var temp = function(widths) {
        widths = widths.map(function(f) {
            return f.set('dist2cl', f.distance(poi, 30));
        });
        return ee.Feature(widths.sort('dist2cl', true).first());
    };
    return temp;
};
var getNearestCl = GetNearestClGen(poi);
Then, we will need to use the map method on the input collection of water masks to apply the rwc to all the water mask images. This will result in a FeatureCollection, each feature containing the width quantified from one image (or time stamp).
// Multitemporal width extraction.
var polygon = poi.buffer(2000);
var coords = poi.centroid().coordinates();
var lon = coords.get(0);
var lat = coords.get(1);
var crs = getUTMProj(lon, lat);
var scale = ee.Number(30);

var multiwidths = ee.FeatureCollection(jrcYearly.map(function(i) {
    var waterMask = i.gte(2).unmask(0);
    waterMask = ee.Image(waterMask.rename(['waterMask'])
        .setMulti({
            crs: crs,
            scale: scale,
            image_id: i.getNumber('year')
        }));
    var rwc = rwcFunction.rwGen_waterMask(2000, 333, 300, polygon);
    var widths = rwc(waterMask)
        .filter(ee.Filter.eq('endsInWater', 0))
        .filter(ee.Filter.eq('endsOverEdge', 0));
    return ee.Algorithms.If(widths.size(), getNearestCl(widths), null);
}, true));

var widthTs = ui.Chart.feature.byFeature(multiwidths, 'image_id', [
    'width'
])
    .setOptions({
        hAxis: {
            title: 'Year',
            format: '####'
        },
        vAxis: {
            title: 'Width (meter)'
        },
        title: 'River width time series upstream of the Three Gorges Dam'
    });
print(widthTs);

Map.centerObject(polygon);
Map.addLayer(polygon, {}, 'area of width calculation');
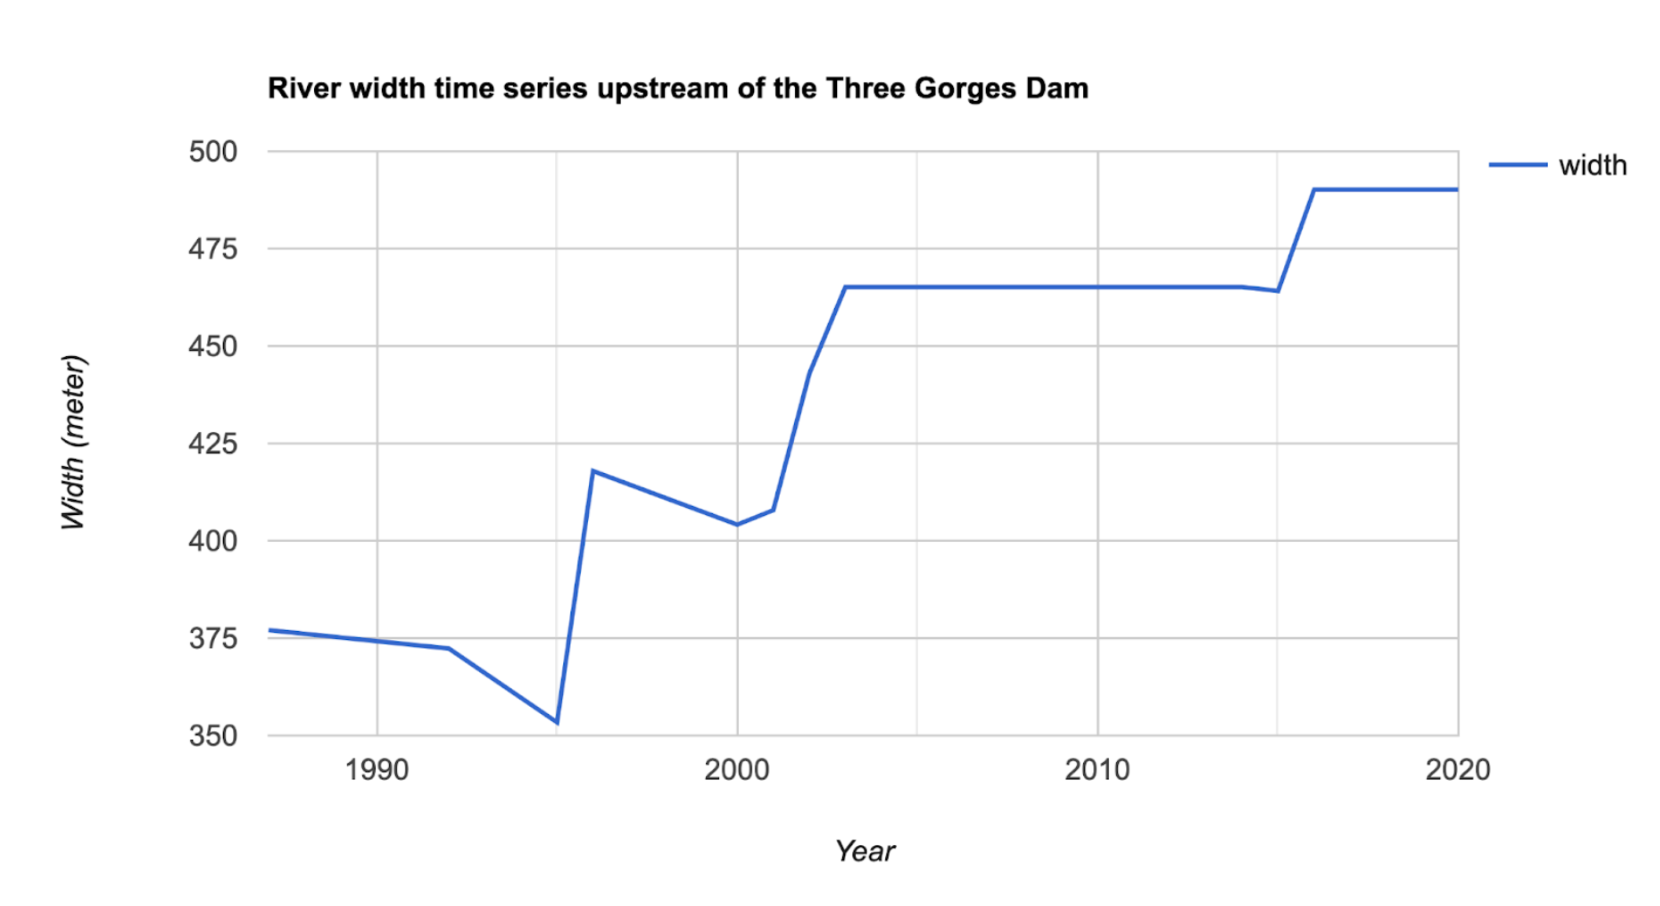
Figure: River width time series upstream of the Three Gorges Dam in China. The series shows the abrupt increase in river width around the year 2003, when the dam was completed.